


On the left, you can see the difference of sanded lino versus the one on the right side which has not been sanded. When inspecting the sanded linoleum, you will see that it has a smooth, matt look that is slightly speckled.
Linoleum that has not been sanded has an "orange peel" look and is shiny.
Why, you may ask, is it neccessary to sand the lino? The reason is that the lino cuts easier and the ink goes on much smoother.


This is a highly detailed Lino print, Above you can see the scale of the print. Most of my learners work on A0 and bigger.

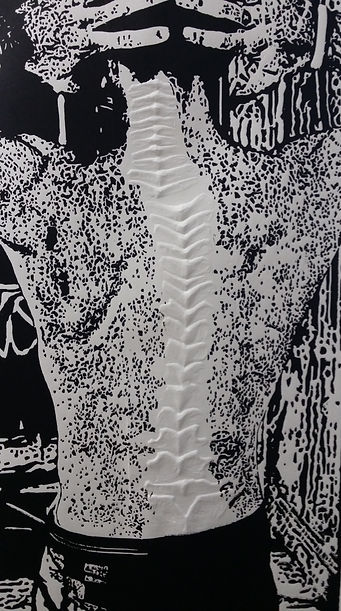
This is a combination print, normal lino print and embossing


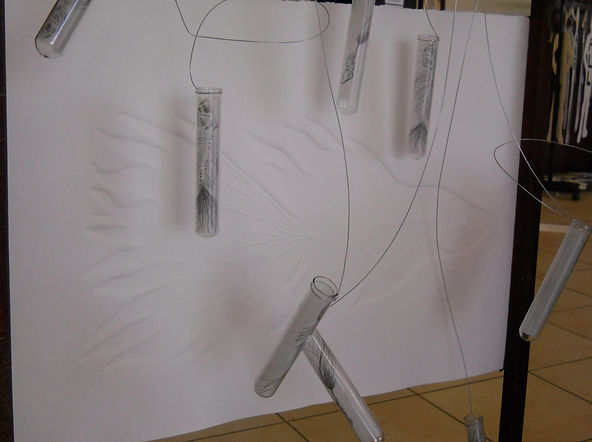
Above: An embossing representing the human eye. In the center of the image is a glass bowl with black ash.
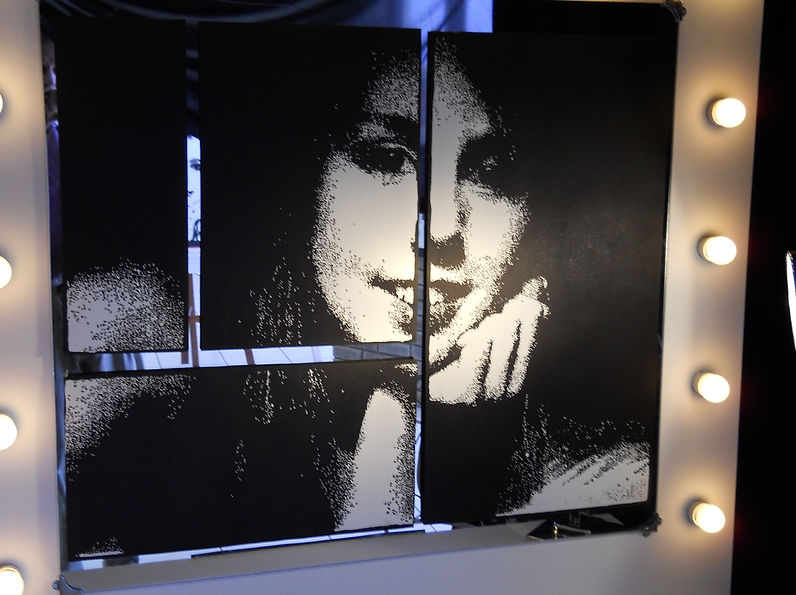
Colour Lino prints and mixed media
Lino is a wonderful medium to use with other mediums. On the left is a two colour lino print in combonation with drawing. Above right is a black and white lino with cut out pieces of colour lino print stuck onto the print. The eyes have been cut out and a television screen was used behind it creating "white noise" which was seen through the holes of the eyes. Colour pencil was used for the lips.
A very complicated colour lino making use of puzzle blocks and reduction cutting.
Above is an embossing of the skeletal structure of a fish used in an installation.
Linoleum Printmaking
I believe that there are many new types of linoleum that has been created over the last few years, so it is vital that you research the different types available in your country.
In South Africa, we basically only get two types, the old brown linoleum (also known as Battleship lino) and Breeze cut linoleum, which is basically just a thick type of rubber. Both are priced the same. My personal preference is the brown lino as you can do various techniques with it – ordinary prints and also embossing. I am glad to add that the light grey lino, as can be seen in the image below, is also available in South Africa. The rubber type is awful, as the fine detail tends to bend when printing giving you a blurry look.
For this demonstration on how to do printmaking using Linoleum, I will be speaking on how to use Brown Linoleum.
I teach printmaking in grade 10. Learners in higher grades (grade 11 and 12 can then explore this medium further, should they wish to choose this medium for specialization.) The lino prints that follow and the examples used, are from different grades, ranging from grade 11 - 12.
Preparation
Many people have forgotten that the lino needs to be prepared first before anything can be done with it. The top layer of the lino needs to be removed. When looking at the lino, you will see that there is a shiny nearly oily dimpled finish to the lino. I teach my learners to use water-based sandpaper on a wooden block. First sanding: use 100 grit sandpaper with water. It is essential that the piece of lino should be sanded in one direction, from the one side of the lino to the opposite side. Once this is done, change the direction (cross hatched). Always apply water when sanding. Once sanding with 100 grit has been completed, wash the lino with water. If you see shiny areas, you need to continue with 100 grit.
After 100 grit sanding is completed, use a 300 to 400 grit water based sandpaper in the same way as you did with the 100 grit sanding.
The approach I use for creating a lino
Learners select their own images fro creating their concept development. I encourage them to make use of their own photographs. In concept development (brainstorm drawings) they need to look at using the same subject matter, but it can be from different angles and incorporate different backgrounds that will enhance their message. These drawings are done in graphite looking at creating all the tonal values possible.
Exploring concept development (brainstorm drawings)
Exploration of compositional development
(An example of detailed stippling) This is the actual final print of the learner.
Transferring your image onto Lino
The chosen image is then enlarged on a powder based photocopy machine to the desired size of the final artwork (the size of the lino that is to be printed). Because the drawing is photocopied on a larger format, the dots will be much bigger.
I would urge you to do the transfer process in a well ventilated area.
Place the photocopy face down on the clean lino. Using a cloth with acetone (do not soak cloth, use the acetone sparingly), rub the back of the photocopy to transfer the image onto the lino. Try and rub down the photocopy as soon as it is printed, this will result in a better transfer. You can get a better transfer if you iron it with a hot iron after applying the acetone. If photocopy is done on an inkjet printer or lazer printer, it will not work. Make sure that the photocopy is held down firmly. Apply as much pressure as the photocopy paper will allow when rubbing it from the back. Sometimes, the first rubbing is not successful, in a case like this, remove all traces of the old rubbing with thinners and then rub down new photocopy. Acetone can also be used to transfer the photocopy onto the lino.
Carving the lino
Before carving starts, make sure you have a black border drawn with a black permanent marker around the edge of your lino.
This will help keep the roller away from large cut areas when inking the linoleum takes place.
(To make carving easier – use a heating mat underneath linoleum. Don’t let linoleum get too hot – it will become brittle. Learners can also sit outside the classroom in a sunny spot – this will heat up the linoleum).
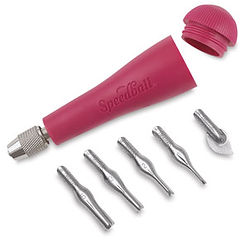
I suggest that a small V shaped blade is used to carve alongside the black lines first. The U shaped blades can be used to remove larger areas afterwards. I use high quality carving tools for lino as they stay sharper and create the best cuts (Speedball lino cutters work well). I have purchased a few Pfeil lino cutting tools. It is expensive but will never regret this purchase.
It is important that the learner should experiment with different blades and the marks they create before starting to cut their final lino. This can be done on little offcuts you may have.
Highly detailed areas do not need deep carving. Large white areas need to be carved deeply and should be flat as any areas that have ridges will pick up ink and show in the final print.
The more time the learner spends on the cutting process, the better the quality of the end product is going to be. Learners need to try and carve around each dot that they see. Quick carving will result in weird triangular shapes that do not look good and will give an undesired effect. I am quite strict with cutting and will not allow printing to proceed until the linoleum has been cut properly.
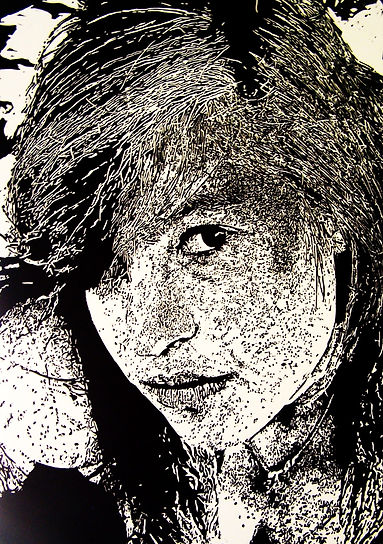
Example of detailed areas and larger white areas cut.
(This is a grade 11 print – Self portrait)
As you can see, this is extremely detailed and the learner has used linear lines for the hair and little dots to create the different tonal values in the face. Thin lines are cut as shallow as possible. The deeper you cut, the thicker the line will be.
Registration of lino
I make use of an etching press to print the lino’s. Tape down a piece of paper onto the bed of the press. This taped paper must be larger than the paper you are going to print with. Place printing paper in the center of the taped paper and draw a line at the bottom onto the taped paper. Make registration marks on the back of the printing paper and the taped paper. Register all the printing paper that is going to be used for the edition that is going to be printed.
Place the cut lino in the center of the taped paper and draw a line around the lino with a permanent marker. You can shift it around to make sure that it is in the correct place of the printing paper.
Inking in the Linoleum
Make sure that the area that you are setting up for printing is free of any dust or dirt. It is vital that this area is extremely clean. I use a thick sheet of glass to role the ink onto, but you can also use a slab of polished granite or a large smooth tile.
I do not bother with small lino rollers as inking is uneven and they tend to go onto large cut areas. I use large lithography rollers. The larger they are, the better. Make sure that the roller has also been wiped down before inking takes place. Any dust or dirt left on the roller will land up in the ink and onto the linoleum, which will cause unwanted marks on a print. Slap the carved linoleum on the back to remove any little pieces of cut lino (you will be surprised how much dust and grime will come from doing this, so do this outside). Should you have any frayed bits of backing (the matting string) on the side of the lino, burn them off with a lighter or candle (they tend to pick up ink and will give a dirty edge when printing).
Tip: If you have a cold classroom like me, heat up the ink slightly or print during the summer months.
make use of good quality oil based printing ink for printing (something like Coats printing ink).
Spread out the ink onto your clean piece of glass in a line by means of using a clean pallet knife. I place the ink at the top end of my glass. Use your roller and pick up some ink (you can also put ink directly onto the roller, but I prefer to place my ink into the glass surface). Roll the ink onto the glass, spinning the roller as you lift it up each time. Roll ink in different directions until the piece of glass is covered in a thin even coat of ink. The texture you want to achieve on the glass should have the look of velvet. Do not have a thick layer of ink on your glass. Should this happen, roll out on a new area of the glass. The ink must be thin. The reason for this is that you want to rather add thin layers of ink onto your linoleum. This will prevent ink from going into the thin and shallow lines that you have carved. Roll several layers of ink onto the linoleum. The look you want on the linoleum is the same look of velvet you have on your glass plate. Before printing, inspect the linoleum from side on to make sure there are no bits and pieces of loose lino in the ink. Should you find any, remove them and roll a new layer of ink onto the lino. Inspect the ink on your glass at regular intervals for dirt. Should ink get onto white carved out areas, remove with cloth and lacquer thinners or acetone. The acetone dries the area more quickly (do not use turpentine as this does not dry the area).
Printing
Place lino face up on the placement marks you have drawn. With paper lifted, place bottom of paper on registration line and match up registration marks, lower gently onto inked lino keeping a hand on the bottom of paper (where the registration marks are drawn). Give it a little rub on the back of the paper so that it adheres to the ink. Lower felt blanket onto the lino and print. Place a piece of masonite on top of the paper. This will prevent the lino having an embossed look. Place mat on top of masonite.
The first prints may not be good as the inking takes a bit of time especially if you are going to print your lino onto expensive paper like Fabriano Rosapino (which I use). Use a cheaper paper for the first prints and then go to your edition paper. Why do I use expensive paper? It gives you a much better final product. Your press must be set to a very light pressure. You do not want an embossed look. If pressure is too high, you will find that delicate lines will be lost. This takes a bit of practice and getting to know your press. If you are using a sturdy product like the old brown linoleum, you can roll several times, adjusting the pressure (softer linoleum like the rubbery Breeze cut will leave a blurred look).
Re-ink after every print.
Stripping the print
Many people do not do this and unfortunately, a shiny end result is achieved!
Stripping the print is the final touch that gives you a professional look to your print.
Use newsprint for this. Place newsprint onto the printed paper, keeping it in place with one hand. Rub with a flat hand over newsprint. Strip off excess ink from your print until you have no ink come off on newsprint.
You can also use your press to strip excess ink. Tighten press on a high pressure and send through prints with newsprint on top. Repeat process until all excess ink has been removed. This will result in a matt print with the thinnest layer of ink, which will also speed up drying time! I suggest that the whole edition is done before you strip ink with your press, as you do not want to adjust the roller once you have started printing.
Tip: Should you have any areas to fix on your print, dirt spots in black areas, use your finger with a little ink working in a tapping motion on the affected area. This should be done before stripping takes place. Stripping will remove any tell tale signs of fingerprints etc.
Tip: Use surgical gloves when rolling in ink, so hands stay clean when working with paper. Oil based ink tends to spread everywhere.
Examples of Lino prints done by my learners through the years.
Once they have completed these drawings, they do compositional drawings with their chosen brainstorm drawing, looking at enlarging the subject matter, shifting it away from the center and creating the best possible solution. These drawings are done in stippling with a black fine liner felt tip pens. Different sizes nibs can be used for these drawings, creating fine dots, larger dots and mark making to solid black areas. The more detail that is added in these drawings, the better the end result of the artwork will be. I do suggest that these drawings be at least A4 in size.